ATC

Abandon the Cube

Archives 2014

2014 in Review

This has been an interesting year of short excursions around America, several road trips and a few flights across country. We’ve traveled across numerous states and have seen a great deal of geographic variance as well as changes in people, food, music and culture. This really is a big country and sometimes, especially when it comes to places like Texas and the U.P, little alcoves of America seem like their own little countries. Here is a roundup of some of the places we visited this year.

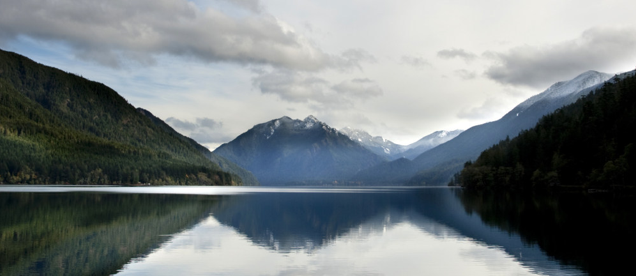
Travel to the Olympic National Forest in Washington, USA

I traveled out to Washington for a wedding and was overjoyed that it was an outdoor affair full of swords, ferns and coffee. It was a wedding that fit the beautiful surroundings of Port Angeles. The redwoods were tall, thick and stunning, and the lakes raging like the rest of the wilderness around the national forest. Coffee, the main staple of the Seattle-dweller, is strong and drunk black. The people are so in love with the outdoors that they carry backpacks instead of purses, and wear boots instead of heels. That’s a win in my book. Overall rating of the scenery, people and food: 9 out of 10.

Screen Shot 2014-12-31 at 4.23.45 PM

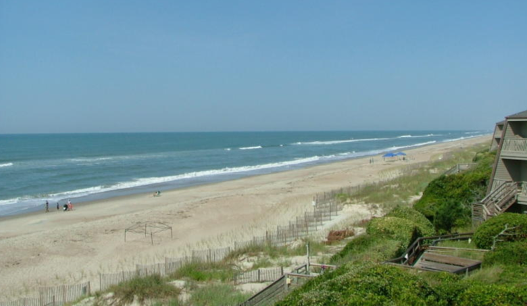
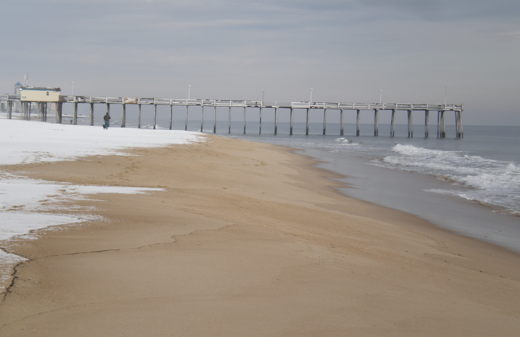
Travel to Ocean City, Maryland, USA

Visiting Ocean City in winter is an odd adventure. It is like visiting a carnival before it opens. The clowns and bearded ladies are still there, but they aren’t yet smiling for the crowds. I walked along the beach and was the only person out there being pelleted by the whipping wind and freezing waves. Domesticated squirrels would run up to my legs and beg for food while disenchanted locals would push them out of their way with booted toes. If you ever wondered, restaurants at the beach are overpriced year round– not just in the summer.

Screen Shot 2014-12-31 at 4.25.20 PM

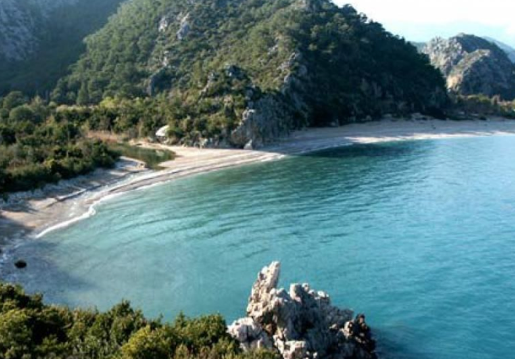
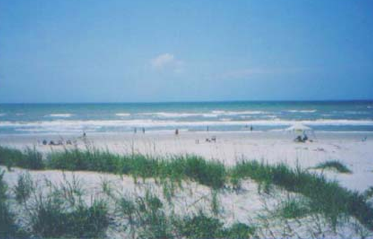
Travel to Beaufort, North Carolina, USA

We spent a week at the beach and rented a small house on the shore within a stone’s throw of public access. It was a glorious blur of sand, sunscreen, and bright colors. We go every year and every year it gets busier and the crowds get thicker and the seagulls get more aggressive. It’s a beautiful spot, but since it is getting so crowded I imagine it won’t be beautiful for long!

Screen Shot 2014-12-31 at 4.26.17 PM

Road Trip to Justin, Texas, USA

I drove myself, my mother and my toddler to Justin, Texas from North Carolina. We stopped in Nashville, Texarkana and finally Justin. If you have never driven in Texas be forewarned the road signals hang horizontally across wires and (surprise) I got a ticket for running a red light when I thought the yellow was one of those flashing warning things. Anyways, live and learn. I also learned that Texas had a boatload of excess money that they use to put in TONS of spaghetti-roads and then decorate them with the lone star. No, I didn’t end up buying any boots– although  I did look! Also, if you ever fly out of Dallas– be warned that it is the most chaotic airport this side of Heathrow. I had to pay just to drop my mother off at her terminal! Not a fan of the airport, but I’m quite a fan of the rest of Texas that I saw.

Screen Shot 2014-12-31 at 4.27.11 PM

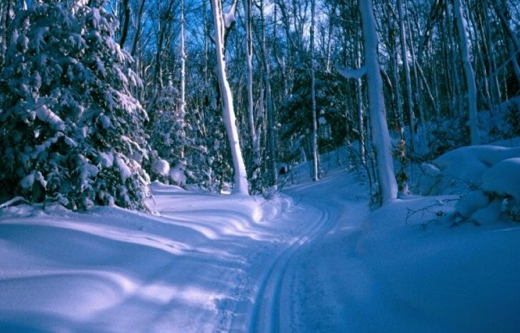
Travel to Marquette, Michigan, USA

We come up to the U.P every once in a while to visit family and this year we were fortunate enough to come up to the U.P twice, once in the summer and once in the frozen winter. Winter is my favorite season and the U.P is about the best place to experience it. ATVing in the snow, snowshoeing, ice fishing, sledding, and all kinds of other frozen festivities await you in Marquette and the surrounding towns. Hey, Jeff Daniels spends his time up here, so it can’t be all bad!

Screen Shot 2014-12-31 at 4.28.05 PM

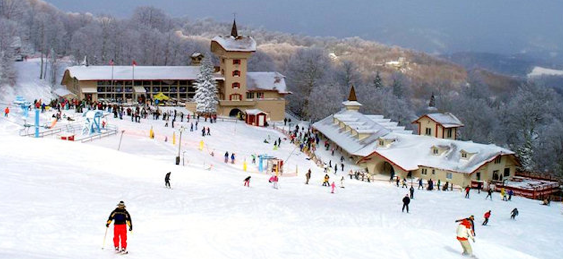
Travel to Beech Mountain, North Carolina, USA

Since we live relatively close to the mountains of North Carolina, we get to make a few trips a year up to Beech Mountain, near Boone. It’s a delightful small down with all the amenities nearby of a major metropolis. On top of Beech Mountain is the highest bar on the east coast, I hear tell. Yes, we’ve been there. You have to ski your way down after a few very strong, locally brewed drafts. Well, you don’t have to but it’s way more fun!

Screen Shot 2014-12-31 at 4.28.45 PM

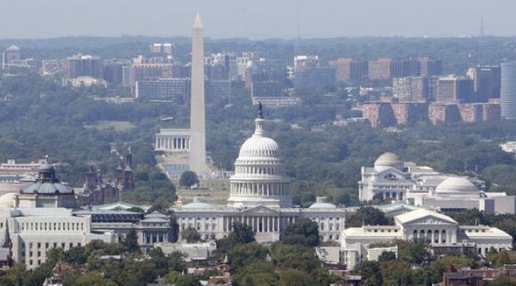
Travel to Washington, District of Columbia, USA

We went to Washington D.C a few times in 2014, mostly because we have friends in the city. It’s an amazing capital and truly befitting the country. All the major museums are free and it’s a delight to get to explore so much history for free– as it should be! There is always something fun going on. Last time up in DC I saw a group of people preaching the good word, loudly– almost violently, in China Town. At other times there are demonstrations near the White House. On one other trip I was fortunate enough to get to stay out in Leesburg, where we did a night time stroll of the town’s haunted sites (yes, it was Halloween!).

Screen Shot 2014-12-31 at 4.29.52 PMHappy 2015. May the year bring you more travel, more freedom to roam and a better appreciation of the wide, wide world!


ScoreBig Tickets

ScoreBig_crowd

ScoreBig.com gives users the opportunity to bid on different even tickets around their area.  Similar to Priceline.com in the early years (but not with plane tickets), users select the concert, theater play or sports event they would like to attend and then they bid for tickets below the ticket office price.  There is a bid meter which tells you the likelihood of your bid being accepted as well as details about the discount percentage other ScoreBig users have received on the same event.  There are no fees and you get an immediate answer regarding your bid.  My first bid was for three tickets to Disney’s Frozen on Ice.  My bid was not accepted, but a counter bid was sent and I had over a minute to decide if I would like to purchase at their countered rate – which I did.*

Even if they do not have the event you are looking for, you can request that it be added to the ScoreBig website.  I think it is a great platform to stay on top of local events you may like to attend and to pay less than face value for tickets.  I would use the service again as they also send email updates for different venues when they are offering major discounts (up to 60%) off.

*ScoreBig.Com approached us to review their site and offered a promo code in return to try out their services. We had no obligation to write a positive review, and were genuinely excited to learn of the service and what they offer.

Atlantic Beach, NC

These days we don’t really get to Abandon the Cube as much as we’d like, but this week we’re in sunny Atlantic Beach living the dream.

And by dream I literally do mean living a more vivid dream. I read once that people along the coasts dream more vividly and live life a bit more wildly. At the same time, more great thinkers, philosophers and dreamers have come from coastal cities than inlanders. I knew this before we arrived at the beach and I was looking forward to insane dreams with M.C Escher stairs with droopy Salvador Dali animals running up and down. Oddly enough, the sun has made me more tired so I haven’t been dreaming at all. On the other hand, I had an awesomely deep conversation about the pitfalls of the Machiavellian state vs Confucianism this morning, which was unlikely to happen back inland so there is that….

Screen Shot 2014-06-22 at 2.26.15 PM

Dreaming

One thing I’ve always hated about the beach is how commercial it is. And it’s not just American beaches. I went to the beach in Turkmenistan a few years ago and there was a guy selling inflatable bananas, crocodiles and beach balls just like the guy on the coast here in sunny North Carolina. The only beach I’ve ever been to without capitalist swarming all over it was in Olympos, Turkey.

Screen Shot 2014-06-22 at 2.24.06 PM

Olympos, Turkey

You had to hike through a jungle following a wall built in the Hellenistic period and the jump around a wall made during the Roman Empire to find this stunning blue lagoon full of hippie backpackers. It was paradise. If I found out tomorrow I had an incurable disease you’d find me the day after on the beach in Olympos looking out of crystal waters with ancient ruins behind me in the jungle. Truly awesome.

Screen Shot 2014-06-22 at 2.23.45 PM

Atlantic Beach

And the beach here in North Carolina could be like that if it wasn’t so developed. My uncle has a place along one of the canals and across from his home is an uninhabited island jungle that looks amazingly fun to explore. I bet the pirates of old have buried treasure out there somewhere.

Screen Shot 2014-06-22 at 2.27.10 PM

Pirates of North Carolina

I’m also reminded, while looking out at the ocean, how close the Nazi subs were to this very area, and how many ships met their doom at Nazi hands right off the coast here. As one historian put it, “It wasn’t the US Navy or Coast Guard that controlled the Atlantic coast in 1942, it was the Nazi U-boats.”

One U-boat captain told his son (who survived him through the war) that he was most amazed at how life continued on as normal in the US despite it’s being at war. People were on the beaches every day, boats went out on joy rides ride near the lurking subs (unbeknownst to them obviously) and at night the coast was lit up from all the bars, parties and general merriment. This may be one of the reasons Americans have a reputation abroad as always jovial, never serious.

Screen Shot 2014-06-22 at 2.30.07 PM

U-Boats Prep for the Atlantic Campaign

Pretty stunning how much history there is right off the coast. (Not even counting the stuff in Kitty Hawk–the first flight of the Wright Brothers.)

Screen Shot 2014-06-22 at 2.38.43 PM

Wright Brothers in NC

Six Songs for a Bachelor Holiday

While the words “bachelor holiday” inspire a certain level of apprehension in parents, other halves, hotel and restaurant owners and flight attendants, getting away with your mates isn’t always a sordid, drunken affair filled with bright blue vomit, public urination and questionable sexual escapades.

Untitled1

However, there’s a wide range of things, some of which are listed below, that groups of male friends can go abroad to experience and do without their wives or girlfriends fearing the worse about what they might get up to. Every holiday needs the perfect soundtrack so that, when a certain song comes on the radio in twenty years, you’ll immediately flash back to the magical week you spent getting sunburned and drunk in Malia after your A-Levels. Here, then, are the songs that will soundtrack any lads’ holiday.

The island holiday: Get Lucky (Daft Punk)

There’s one tune every year that becomes the world’s unofficial “song of the summer”, leaking out of bars and clubs from Ibiza to Miami. It dominates the season (often being released in April or May so it can build a reputation before June-September), has an infectious beat and singalong lyrics and is usually crowned the biggest-selling single at the end of the year. We’ve had “Crazy In Love”, “Umbrella”, “I Gotta Feeling” and “Gangnam Style” in years gone by, but nobody yet knows what the 2014 song will be. With that in mind, we’re going to go with last year’s song of the summer, “Get Lucky” by Daft Punk, as the track of choice for your island holiday.

Untitled2

The football tour: Three Lions ’98 (Baddiel, Skinner & The Lightning Seeds)

With the World Cup in Brazil just around the corner, what finer adventure could you have this summer than following and supporting the England team around the country? Not only will it be relatively cheap (because there’s no way that England are going to qualify from their group, and you can save money on flights at http://www.easyvoyage.co.uk/flights/comparison), but you’ll get to experience the entirety of one of the most vibrant countries in the world, rather than just Rio or Sao Paulo. When you’re four hours into a baking hot minibus journey to the next game, there’s only one song you should be playing on the stereo: the immortal “Three Lions ’98” (it’s lyrically better than the ’96 version). Football’s coming home…but probably not this year.


The stag do: White Wedding (Billy Idol)

Untitled3These days, more and more men are embarking on stag weekends, rather than stag nights, as the demand for extravagant celebration of the death of a man’s lothario lifestyle grows. Whether you’re travelling up and down canals on a barge or having a few days in Prague, Billy Idol’s sneering ode to matrimony, “White Wedding”, offers the perfect hard rock alternative to all of those disco classics and saccharine-sweet love ballads you’re going to be subjected to at the wedding itself. Try not to let it get into your brain, though – it won’t make a particularly good impression if your bride hears you humming it to yourself at the altar…

The ski trip: Surfing With The Alien (Joe Satriani)

Untitled4

Obviously you’ll be listening to music while you’re enjoying yourself après-ski, but many people like to listen to music played via their iPods or iPhones while they’re tearing down a mountain at fifty miles an hour. Unless you’re an experienced skier, it’s probably best to keep your hearing clear, but it can be hard to resist the driving tempo and spacey solos of Joe Satriani’s signature guitar instrumental, “Surfing With The Alien”. Just make sure you use your hands to guide yourself down the run and not to play air guitar – you don’t want to ski off the side of the slope!

The Vegas/Monte Carlo blowout: Luck Be A Lady (Frank Sinatra)

If you decide to push the boat out and hit the casinos of Las Vegas or Monte Carlo, then you’ll need all the luck you can get to ensure that you don’t have to declare bankruptcy when you get home. The best Sinatra version of “Luck Be A Lady” from Guys and Dolls, the quintessential musical ode to gambling, can be found on his album Duets II and features Chrissie Hynde as Lady Luck. With just the right amount of swing and style (as if Ol’ Blue Eyes would have had it any other way), this is the song to play to get you in the right frame of mind before you hit the casino floor.

Untitled5

Traveling: I’m Gonna Be (500 Miles) (The Proclaimers)

Finally, you might decide to travel around Europe or America or the Far East for a few weeks, and there’s only one song that you should be uploading to your iPod to pass the time spent on trains, buses and planes. It has unlimited re-play potential and a jaunty tune that no-one in the history of the world has ever got bored of. It’s also a one-hit wonder by two identical twins from Scotland who, presumably, have also never become bored of playing it instead of the hundreds of other songs that they’ve presumably written and recorded. Yes, it’s “I’m Gonna Be (500 Miles)” by The Proclaimers, and it’ll make you feel excited for the journey you’re embarking on and wistful when you think about your eventual homecoming.

Untitled6

Strategies for Blackjack Players

As many of you know, traveling takes money. One way to make that money is at the table. Naturally, we don’t encourage unsafe gambling and all gambling is just that– a gamble with your money and time. That being said, we do know some travelers who funded amazing adventures with cards. So, below is some information on blackjack.

___________________________________________

If used properly, blackjack basic strategy can reduce the house edge and make it easier for you to win.

This minimum edge can be as low as half a percent but will only be achieved if you learn the basic strategy and apply it correctly. Learning basic strategy is now more popular than card counting as most players do not have the concentration, patience, and persistence needed to do this properly.

blackjack2

What is the basic strategy?

Based originally on the mathematics behind the game, this strategy has been refined and tested using computer simulations. There is a basic strategy chart but minor adjustments can be made depending on casino rules and for multiple and single-deck games.

The chart dictates how you should play the first two cards depending on the up card of the dealer. You will then need to learn how to make decisions after you take a hit. The best place to start is by translating the basic chart into simple English, explaining how you should play a hand when three or more cards are involved.

Hard hands

These are hands involving starting cards not containing an ace. Basic strategy says that you should always hit if you have an eight or less. If you find yourself with nine, double if your dealer has between three and six, otherwise hit. Ten – dealer has two to nine – double, otherwise hit. 11, dealer has two to ten – double but hit if dealer holds an ace. 12 – hit when dealer has three or two, stand if between four and six, otherwise hit. 13-16 – hit unless dealer has two to six. Always stand if you have between 17 and 21.

Soft hands

A soft hand is one containing an ace. If you hold an ace 2 or 3, double if dealer has five or six, otherwise hit. Ace 4 or 5 – dealer has four to six so double, otherwise hit. Ace 6 – stand if dealer has two, seven, or eight; double if dealer has three to six, otherwise hit. Always stand if you have ace eight or nine.

Blackjack-cc

Pairs

Always split with a pair of eights or aces. Twos or threes – split if dealer has two to seven, otherwise hit. Fours – split if five or six, otherwise hit. Fives – double if two to nine, otherwise hit. Sixes – split if two to six, otherwise hit. Sevens – split if two to seven, otherwise hit. Nines – split if two to six, eight, or nine. Stand if seven, ten, or ace. Always stand with a pair of tens.

Card counting

If learning the basic strategy is not for you, card counting is still an option. The most common version of this is based on statistics that say that high cards, in particular tens and aces, are more beneficial to the player than the dealer, while low cards, particularly fours, fives and sixes, are better for the dealer.

A point score estimating a card’s value is assigned to every card that the counter sees and they then keep a tally of these. These values should reflect a card’s EOR, or Effect of Removal, indicating the impact on the advantage of the house.

The most basic scheme is known as a high-low system but there are more complicated versions that can increase accuracy, such as Wong Halves and Zen Count. There is a debate, however, about whether these complicated systems detract from a person’s ability to play. It may, therefore, be more profitable to play the simple version quickly than to play a more complex count slower.

Advanced strategies

There are many advanced techniques that studious gamblers will try, such as shuffle tracking and clump reading, but these are so labor-intensive and complicated that it may be more profitable to simply use a basic scheme and test yourself against the Full Tilt Casino house.

Only players with supreme intelligence and flawless attention to detail can even attempt these techniques in a traditional casino and, even then, some form of subversion is also usually needed, such as a calculation device or observation help. This is a huge risk when both of these are usually banned by the house and are actually illegal in many cases.

images

Broaden your Horizons – And your Mind

The following is a guest post by Anna Jones.

Broaden your horizons – and your mind

Further education isn’t just about lectures, seminars and books. An equally valuable part of your university experience is learning about culture, social integration and life itself.

Why you should consider studying overseas

The high price of tuition fees and the increasing cost of living in the UK has prompted many young people to look overseas for alternative options rather than studying at a university at home. With an increasingly complex global jobs market, graduates need to demonstrate other skills as well as a good degree. Studying overseas may equip young people with these additional assets. There are numerous universities across the world, including the RRIS-Israel study abroad programmes , ISP USA, CIEE Netherlands, and many more, where you can enjoy a totally novel life experience as well as completing your studies.

StudyAbroad-main

Explore the world through learning

When you read accounts of famous peoples’ college days, it’s usually not the subject matter of the lectures that’s recalled, it’s the friendships and the adventures that play the most important part of any narrative. If you choose to study abroad, you’ll be joining the 22,000 other students who are enjoying the experience of living and studying in a different country. The British Council suggests that personal development is as important as a professional qualification for future employers as well as your own aspirations.

Different cultural experiences will improve your mind

Whether you choose to study art history in Florence, or go to Israel to study psychology, you should discover as much about your chosen destination as possible. Some of the questions that you should be asking will concern language and accommodation costs as well as the curriculum. Do try to go on a language course as part of your preparations. You may think that if the course you chose is in English, you won’t have to bother, this is not the case, and you’ll be constantly frustrated at not being able to communicate fluently with others. A recent article in The Guardian, written by a blogger who had studied chemistry in Belgium, gives a useful account of the benefits of living and learning abroad. Cultural differences should always be embraced, suggests the blogger.

imagses

Experience a new country and discover the true meaning of education

It’s no use studying abroad if you miss out on the national culture and the fun. Culture can mean ancient cities, and archaeological sites, so even if you’re not keen on history, visit these places to try to understand the national passions of your fellow students. Alternatively, culture can mean films, bars and festivals, as well as conversation in the shops with some locals. You’ll want to enjoy your new experience, and that does include having fun.
Take the plunge – study abroad

In previous decades, and even centuries, overseas study was restricted to the wealthy. You’ll discover that contemporary degree courses vary greatly in cost, as do living expenses, but some will find their chosen course and the country much cheaper than the UK. The Independent has published some useful facts about universities all over the world. If you learn abroad you’ll not only improve your chances of getting a job, but you’ll also become a better-informed and insightful adult.

Fernweh Originals

I’m happy to announce that I have begun selling my artwork. You can find paintings, custom hand-painted furniture and home decor by me at Fernweh Originals on Etsy.com, Facebook or browse originals and reconstructions at Melange in Winston Salem, NC.

IMG_6865

Original artwork and headboard by Fernweh Originals

I want to thank all of you for being supportive of my art over time. It has been amazing hearing many of you encouraging me to list and sell my artwork. I want to thank my family– and Kristin and Heidi in particular– for their recent encouragement.

Gallery Showing:
I will be holding my first exhibit this summer. Please stay tuned for more information!

IMG_7005

Lauren: Designer at Fernweh Originals

What’s Online?
My paintings and home decor are listed on Etsy.com, and include shipping costs. As friends and family, if you would like to buy a painting you can contact me directly and I can arrange to deliver it to you if you live on the East Coast (The D.C area to N.C).

IMG_7341

Original artwork available on Etsy.

What’s in North Carolina?
Much of what I have for sale is presently in the Piedmont. You can find larger items (like refurbished furniture, chandeliers, home decor, etc.) at Melange off University Avenue in Winston Salem. You can also find items at Farrago, off Hanes Mall Drive. Contact me if you see an item you like and I’ll direct you to it’s location!

IMG_7700

Custom, French-inspired piece. Available at Melange in W-S, NC.

Custom Artwork:
I will be creating commissioned, custom artwork in addition to the selection you can find online and in the Piedmont. To order a custom piece, please contact me directly with your ideas to receive a quote.

The Process:
You can find many of the items I’ve created for sale in my blog roll. I sometimes have before/after photos of furniture I refurbish, as well as art pieces that are on-going or over-sized. To find anything related to my art, search Fernweh Originals as a keyword on the ATC blog, or DIY.

Thank you all for your ongoing, loving support and for encouraging me to pursue my dreams!

Love,
Lauren

Abandon the Cube !!!

French Dresser Upcycle

I found another dresser with a decent frame on Craigslist. Yes, I check out the listings every few days for cheap, sturdy furniture that I can refinish and hopefully sell. Here is the original photo posted to Craigslist.

Screen Shot 2014-05-12 at 2.36.02 PMI really like the tiered look, the two sections and the cute cut-out by the legs. Not a bad shape and I think the clean lines will make this a nice canvas for something a bit more wacky and fun than I normally do. I want to treat this basically like a canvas of wood that happens to have drawers instead of a dresser to paint on. It is going to need some new hardware, and it looks like the second-to-last drawer has a chunk missing that I’ll have to replace, but all in all not bad for $30 bucks! I pick it up tomorrow so we’ll see if it was a good buy.

TOMORROW HAS ARRIVED:

The lady I bought it from was moving to NYC and had to part with her dresser. It was smaller than I thought, but better construction than anticipated. I took it home with the help of a rented Zippy Shell and primed the base. It looks a bit French with the white primer and the base cut. I think I’ll play that up a bit and go with a vintage French-inspired look that pays homage to their national drink: wine.

IMG_6876Next, I plan on trying something entirely new. I plan on trying to stencil in more design using a Martha Stewart stencil and some joint compound. Sounds risky! But if this doesn’t work I can easily sand the ol’ girl down and try again. I think a bit of flare will add to the elaborate cut along the base and give it a more overall French feel. I hope my French buddies out there aren’t rolling their eyes. Sorry if this is the equivalent to painting cowboy hats and hamburgers all over a dresser in France and calling it American.

Believe it or not I found some awesome Oops! paint at Home Depot (I love that they do that!) and it was about the exact color I was looking for anyways (ivory). Bought a liter for under $2 instead of the anticipated $14. Sweet. Then I scrapped the whole idea with the joint compound and texture and instead painted the French label right on the ivory paint. It didn’t look quite finished…. so I did the top and tiers in black to pull in some contrast. I can’t speak French, but I think this is some kind of a vintage perfume label. I just loved the lines.

IMG_7637 IMG_7638

Alas, the white was too stark and I was always planning on an antique finish, so here that is below!

IMG_7695 IMG_7696IMG_7697The light is catching the protective layer of poly I put over the antiquing, but it isn’t all shiny when indoors. That is just a super bright, sunny North Carolina morning.

IMG_7698 IMG_7699Finally, a close up of the label and antiquing. Now, to slap on some hardware and call it good!

Okay, the hardware is on. I went with an aged, antique brass look with simple knobs for the top two drawers and pulls for the remainder. I was originally hoping to have simple black knobs but it looked too Gothic, so I dated it even more with brass. Here are the final photos!

IMG_7700 IMG_7711 IMG_7717 IMG_7719

Total cost for this project: Dresser $30; paint and paint supplies (stencil and compound) $14; hardware: $32=$76.00. Asking price: $310.

You can find this dresser for sale at Melange, in Winston-Salem, NC. See my other items on Etsy at Fernweh Originals or visit my Facebook Page, Fernweh Originals.

Bedroom Redesign

Well I crapped out and didn’t take a BEFORE photo because it was too embarrassing. But below is a picture from a few months ago when I was building this burlap headboard. It smelled and I had to get rid of it. Also, it was made of cardboard and was a bad idea. So was that bedspread. Barf. Anyways, here was the before:

Screen Shot 2014-05-16 at 1.02.18 PM

I will make this quick and show you what my room looks like now. Imagine the before as a condor pooping from on high and that ball of poo splattering all over four walls. That was my room. Here it is now:

IMG_6865

I think the feng shui is much better now with the bed against the far wall and longer (not grey) curtains. I also think this bedspread is more my style and a lot more fun. Anyways, I made the headboard from a piece of butcher-block. I made the painting of the Buddha Buds, and I sourced the curtains and bedspread from the interwebs. I made the lamps from burlap left over from my wedding, and behind the door is a wardrobe I’m refinishing now.

IMG_6873Here (above) is a close up of the headboard in the event you are too lazy to click on the link above. It was my first foray into metalwork.

Below is a picture of the lamp, again, for the lazies out there. I simply cut out burlap to fit OVER the old shade, then I used a stencil to cut designs in the old shade under the burlap so when it is on, designs are projected onto the walls. Yup, it’s pretty neat.Screen Shot 2014-05-16 at 12.54.35 PM

And below is a picture of my cat admiring the Buddha while the frame dries.

IMG_6856

This (below) is a close up of the Buddha face. I poured a ton of paint on the canvas then tried to move it around using speakers. Since the art is about music and tranquility, I thought this would be a neat way to make the music come to life. It worked in some places, and added a cool story to the image. Wherever you see the neon green and magenta swirling, that was music leaving a permanent impression.

IMG_6859

Finally below is a picture of the wardrobe I’m working on. This is a before photo, I haven’t done anything to it yet. We’ll see what happens to the poor sucker. But, in the background you can see the other burlap lamp I made, and a Picaso replica I painted a few years ago. So, this room is almost entirely made by me. Makes me happy. I do plan on stenciling the curtains at some point with the same peacock blue you kinda see in the foreground of the image below. Maybe just a suzani line across the bottom or sides. Still debating on that one.

IMG_6871

You can find this buddha painting for sale on Etsy at Fernweh Originals or visit my Facebook Page, Fernweh Originals.

Antique Desk Remodel

This is my first desk remodel and I have to say, it went alright!

I bought this crappy desk off of Craigslist and didn’t take a photo of it before I got to work. However, I did find a very similar one again on Craigslist and have a photo of that which will have to suffice as my “before” photo.

Screen Shot 2014-05-10 at 2.17.34 PM

I started by filling in verner cracks, something I spend a good deal of time doing these days, it seems. Then, I took off all the hardware and spray painted them with a hammered steel metal paint. They look great now, the old bronze look was too dated for the plan I have for this desk.

Next I primed the sucker really well. It had a lot of imperfections so a thick coat of primer worked to add bulk and fill in some of the cracks. If this is what you’re priming for, try tilting your furniture piece and priming one side at a time. The top side will allow the primer to kind of settle and level on it’s own and erase brush strokes. Takes a few days to prime one thing but it really does work well.

Next I painted the desk a bright green. I’ve been wanting to try a green piece for a while so this is what I settled on. I love it.

I slapped the hardware back on after a few coats of protective finish and here you have it, a sexy desk remodel.

20140510_195555

IMG_7737 IMG_7735 IMG_7733

Oh, and for a little chic surprise, I did some damask designs on the drawers. Mommy has a like.

IMG_7739 IMG_7740

Hope you like it, and sorry there was no real tutorial here. This was just something I was doing for fun.

Total cost for this project: Desk $40; paint: $18= $58. For sale at Melange in Winston Salem: $148.00.

You can find this desk for sale at Melange, in Winston-Salem, NC. See my other items on Etsy at Fernweh Originals or visit my Facebook Page, Fernweh Originals.

Refinishing a Butcher block Table

Well, I’ve been at it again! This time I took a perfectly good butcher block table from the in-laws and refinished it. Before you get all judgy-face let me explain that it had a yellowish polyurethane on it. And if you’re an avid reader of my DIY section you know I loath the yellow poly look. So, while I loved the table, I hated the yellow.

So, I sanded off the poly and sanded down the legs. The top was maple, the sides were something else and had a slightly pink tint. You can see this in one of the images below where the top is white-ish and the legs are yellow-pink. This presented a bit of a problem when it came to selecting a stain that would apply evenly to both the legs and the top. Before I get to that, let me walk you through the abuse and reincarnation this poor table went through. It’s exhausting, mind-numbing and frustrating.

20140308_144454

  1. February 22, 2014: Sanded table top using belt sander (photo above)
  2. February 24, 2014: Applied Bombay Mahogany stain. Didn’t wipe it off afterwards.
  3. March 8, 2014: Sanded off horrible staining job using circular sander. Took forever.
  4. March 14, 2014: Applied Jacobean stain (Miniwax) and wiped it off this time. Yup, learning by trial and error is tedious stuff. (See second image below.)
  5. March 18, 2014: Applied another coat of Jacobean and wiped it off. Look okay, but there are some marks on the top from the original belt sanding from late February.
  6. Late March, 2014: Husband unhappy with the belt sander marks. Sanded down the whole thing. Starting over. Sanded down the legs as well. (see first image below.)
  7. Early April, 2014: My husband applied Bombay Mahogany to the legs and top.
  8. Mid April, 2014: Husband doesn’t like the mahogany. It didn’t go on cleanly because it was a poly-stain mix and dried too fast.
  9. Late April, 2014: Sanded down the table again. Starting over.
  10. Later April, 2014: Applied Jacobean in two coats, wiping between coats.
  11. Daily, early May, 2014: Applied a coat of poly protection each day, sanded with 320 between coats.
  12. May 9, 2014 (today): Got so sick of seeing the table in my work area that I painted the legs black and applied a final coat of poly to the top. I’M DONE WITH THIS TABLE!!!!

20140308_154525

20140310_175425So, after all of that here is the final product. You can see a few circular sander marks on the top. Screw it, they are staying! This was a tough first staining project for us and it took three months to get it to this point. I like it, and it looks better than I anticipated from the start of this long-lasting project. Anyways, here are a few photos! First photo is without a spray protection on the legs. The second photo I lightly (320 paper) sanded the top coat of poly and applied a protection spray to the legs. Looking sexy, table!

20140509_124948

20140511_152217I like how the legs kind of bring out the darker legs on my blue suede chairs and blue booth. Yes, I have a booth in my house. I’m that cool.

This table has been SOLD. See my other items on Etsy at Fernweh Originals or visit my Facebook Page, Fernweh Originals.

Dresser Refinished, Upcycled and Remodeled

I found this dresser on CL and thought, what the hell… I know nothing about refinishing furniture, let’s give it a try. Both Alanis Morissette and I are fully in favor of biting off more than one can chew.

Here are the before pictures. Please puke along with me as we peruse the following horrifying pictures of this antique dresser gone foul. To be fair, I got them off a college kid who was about as friendly as they come. $40.

Screen Shot 2014-05-03 at 2.16.29 PM

Don’t wipe the vomit from your mouth just yet… more pics to follow! If you’re able to see the potential in the piece note the wavy top drawer and the thick frame. Very cool. Very promising lines.

Screen Shot 2014-05-03 at 2.16.38 PM

Ok, you can wipe off the upchuck. I’ll stop posting petrifying photos of the BEFORE disaster that was this dresser. Now for the step-by-step and finally (gasp) the reveal! Don’t skip ahead, you’ll ruin the dragging out of this surprise!

First I used Elmer’s WoodFiller on the crap verneer cracks. It worked okay, but it sands a little too easily so you have to be careful and use a light sandpaper. I used 220. FYI these pics below are of PRE-SANDING phase.

20140503_145130and another to show more filler…

20140503_145133

Next I sanded down the Elmer’s WoodFiller (as mentioned above for the students paying attention) and kinda did a once over with 220 to help the primer adhere. Here is where I will reiterate the fallback to this product (sorry, Mr. Elmer). It doesn’t really sand evenly because it isn’t as strong as, say, the body filler other posts suggest you use. So, I had to do another round of filling and sanding to get the shape and coverage I wanted. This added a long time to the overall project clock because with deep cracks in the verneer I was waiting five hours between application and sanding. That’s a long time to Forrest Gump myself on a log and wait.

20140508_132824

Yup. Next I primed the sucker. Bye bye wood color, hello primer mess. This is always when a doubting Thomas walks in and says something like, “eh. barf. I liked it better before.” This is good because you can make them eat their words later when they realize it was only primer and the best is yet to come. Although honestly it already looks better with primer on…. I used Giddeon primer, I wasn’t impressed with it because it looked thin. I applied two coats then lightly sanded with 220 to remove any brush lines. I’ll be looking for a better furniture primer for future projects.

20140508_140944

The best has come! Paint! This is everyone’s favorite part. I love watching ugly be hidden by pretty, don’t you? Anyways, I went with red because I feel like, for furniture, it is just a stunning color and you can play around with Asian accents (or colonial, French, etc) for drawer pulls and the like. I was playing with the idea of a bright yellow but then realized that fad (only present in my mind) would fade and I’d be left with a canary dresser. Here is a hint of the color. I put on two coats of light paint (cherry red) so that nothing would run. I used spray paint, which is easier than a brush and doesn’t leave any strokes. If you are going to apply a high gloss later, I recommend the spray method as the gloss will bring out tiny imperfections and lines.

20140509_120657

Finally I applied a ton of lacquer. This is mostly to protect it from my toddler, dog, cats, birds and mice. If I lived a different (bachelorette) life where I didn’t have to be terrified of little sticky fingers and dirty paws scratching my furniture creations I wouldn’t have applied so much protection. I’ll take the sticky mess and paws any day! But, if you don’t have that concern I’d say a less shiny protection would suffice.

Drumroll! Here is the before and after picture of my antique dresser refinishing!

Screen Shot 2014-05-10 at 7.28.33 PM

ABOVE: Here is the classic “before and after” shot. Me thinks the red looks fantastic. Sadly, my phone photography skills at night are lacking.

20140510_191124ABOVE: The front looks super sleek.

20140510_191531ABOVE: This is probably how Tarantino would photograph his furniture (at night, with odd lighting and no real explanation).

20140510_191208ABOVE: You can’t really tell what this is in the dark. I’m thinking I’ll get more photos loaded in daylight.

20140510_191133ABOVE: Finally, a good shot of the knobs. I got each unique knob attached and love the look it lends. Up close it doesn’t look childish, it looks eclectic and adorable. Very Alice in Wonderland meets Marco Polo.

20140510_191144

ABOVE: Another close up of my knobs.

Well, there you have it! My dresser remake. Most of the time was spent fixing the cracked verner and sanding. Actually painting and putting on finishing touches accounted for a fraction of the time but all of the fun.

I am playing with the idea of adding a black antique glaze to this to kinda give it a pop, tone down the red and add to the Marco Polo side (while taking away a bit of the Alice in Wonderland feel). Thoughts?

Ok, I did add it. Here is a sneak peak!

20140512_141538

To date, the total cost for this project is: Dresser: $40; paint: $14; Knobs: $32= $86 + spray sheer coat protector (+8)= $94

You can find this dresser for sale at Melange, in Winston-Salem, NC. See my other items on Etsy at Fernweh Originals or visit my Facebook Page, Fernweh Originals.


DIY Headboard from Butcher Block

To continue the theme of upcycling and creating, here is my tutorial (aka, my creation journal, for the granola crunchers out there) on how I made a headboard out of a piece of wood I bought for $9 at the ReStore.

First off, if you live under a rock and don’t know what the ReStore is, it’s the Habitat for Humanity store that sells stuff like furniture, random doors, chunks of wood, knobs, etc. Stuff you need to make a house or stock a house. And it’s awesome. The Winston Salem ReStore is pretty rad, and just moved to a new facility off University Parkway.

Screen Shot 2014-05-04 at 10.02.49 AM

Okay, moving on. Here is a picture of the piece of wood pre-evolutionary metamorphosis at the hands of yours truly. It was dirty, messy, had some water damage, etc. I bought four, 9-foot by 16 inch wide boards from the ReStore and sanded them down. I selected the nicest for this project, and eventually plan to make a footboard and side rails out of the rest of this wood.

20140503_143147

Here is a picture after I cut it to 7 feet, sanded down the imperfections and sides, and stained it with a lovely, sultry dark stain. I used Miniwax because I like that they don’t have polyurethane in the stain. Makes it go on smooth and silky, like butter, and wipe off easily for second and third coats. This stain color is called ________. I put on two coats because I was really happy with how this stain was bringing out such beautiful grain and more seemed to enhance the awesomeness.

20140503_143153

Next I waited a few dozen hours and applied my first coat of Miniwax interior polyurethane. Normally I’d be against this move but I recently refinished a table and this brand of poly isn’t as shiny and obnoxious and color-changing as others. No, Miniwax isn’t paying me to say this (though if any Miniwax executives are reading this– know that I wouldn’t turn down free cash! ha ha).

For some reason between coats of poly you are meant to sand it down with 220 sandpaper and then reapply. No idea why, but like many a non-chemist I just so what chemical bottles demand. So, I sanded it down lightly and reapplied….. about four times. The last application I used a foam brush to decrease the chances that there would be any texture from the brush bristles. Yes, it’s gotten this pedantic.

Finally, I got to what I consider the fun part! This is where I took some metal packing strips and then screwed them to the back of the headboard (see image below) and then nailed them down with some textured upholstery nails on the front. I’m going for an old world industrial look here. Call me a nerd, but I feel like looks that don’t really go well together actually go well together, like how opposites attract. So, we have metal and nails from the industrial, processed, warehouse style fused with a rugged, rough chunk of wood stained to Middle Earth proportions. Clearly, I don’t know any interior decorating verbiage. Work with me here.

20140506_191037

Anyways, this last step was super time consuming and required math. This may be the first time since high school that I had to do real math. Guess my teacher was right, at some point you’d need it and be glad you knew it. Although when I was in school we didn’t have the internet so…. I guess he didn’t know you could always BS your way through anything using this handy tool. Below you’ll see how I spaced out the lines for the upholstery nails.

20140506_190254

Here is a pictures of the final product (just the headboard design). I did this detail work on both sides, about 7 inches in from both sides. Looks bad ass.

20140506_190446If I do decide to go back and make a foot board you’ll be the first to know. I already bought adorable little legs to be the support structure for the foot board and found a 12 foot cedar board for the side rails, so we’ll see if they join my pile of legs, wheels and arms (all wooden, I assure you) growing in the wood shop or actually get adhered to this project. Time will tell.

To date, the total cost for this project is $32 for the wood. $14 for stain, and poly. $2 for upholstery nails= $48

Screen Shot 2014-05-10 at 7.44.07 PM

IMG_6865 IMG_6873

This headboard has been SOLD. See my other items on Etsy at Fernweh Originals or visit my Facebook Page, Fernweh Originals.

Duck Dynasty Cake Creation

I must be in the DIY mood because I have about nine big projects going on around the place. I just finished upcycling a perfectly good dresser. Read about that here. And I’m upcycling a desk and table as well. I got a great deal from the ReStore on 8 foot boards so there is a pile of that in the carport, and I have been building my own art frames, so I have molding all over the den. My yard is starting to look like a traditional North Carolina junk heap of well-intended projects in various states of ill completion. So, with all that going on why not toss on one more project? A themed Cake Boss-style cake!

Today’s project was a fancy cake for my cousins’ birthday. Wolf and Max are young teenage boys who are throwing a Duck Dynasty-themed birthday party. So, after getting on the interwebs I discovered Duck Dynasty to be four bearded men in headbands who make whistles. Odd premise for a business but apparently it is quite successful.  I decided to make a rolled camouflage fondant with a duck on top. Apparently one character is fond of repetition and says, “happy, happy, happy” quite a bit in a mostly ironic way. So, the top will say that with “birthday” on the side.

I made my own fondant out of marshmallows, confectioners sugar and water. It was easier than I imagined and rolled on well. I dyed it with typical food dye and put it in the fridge overnight to harden or cool or whatever happens to marshmallow molecules when chilled.

Next I rolled out little bits and made a camo pattern and kind of pushed the chucks into place and pinched them together. Other tutorials miss this pivotal step. You can’t just roll like this because the chunks will separate. Pinch it all together before you roll. Yeah, it looks like a bunch of cat puke and poop, but it will look better when it’s done!

20140411_122504

Then I found a curtain rod, washed it and rolled the fondant onto that because it was wider than my rolling pin. This is when my husband walked in and asked why I was decorating a curtain rod.

20140411_125430

Finally, I rolled it on top of the cake and cut off the excess with a pizza cutter. Very clean lines this way and easier than a knife, which can cause the fondant to tear. You can see that I left a bit of extra. Later I decided this looked silly and cut it off but originally I was thinking of textured the whole thing like fabric and making it drape. Then I realized the cake was for boys, and that was a lot of effort for lads who wouldn’t really care past the first glance.

duck dynasty cakeHere you can see the finished product. I cut out some letters with a little jello mold set and hand piped some lettering on top. I also made a duck out of rice crispy treats and rolled fondant. After I was done my husband said it looked like a platypus. Oh well. There were not many mallards walking about when I was molding it. I also piped on some texture around the base. It didn’t really need it because the cut was clean but I figured why not? And I had extra icing.

So there you have it, I made a cake, made my own fondant and made a fondant duck. Suck it Buddy from Cake Boss, my cake is pretty damn good for a noob!


Refinishing a Three-Drawer Dresser and Obsessing Over Upcycle-ing

Well, like many Americans with time on their hands I’ve gotten into the upcycle trend of taking crap and making it treasure. It’s a fun past-time and I am enjoying feeling a bit green and hippie while producing hipster furniture. Naturally, like all hipster wannabes, I’m blogging about my masculine foray into woodwork.

Here is a before and after shot of a $20 old sewing table I refinished (ahem, upcycled) into a Chinese end table. The original singer sewing machine is still in it’s red belly, mocking me for my total lack of understanding of the realm of sewing. I had planned to rip it out and put in a bar (something I am very familiar with) but I couldn’t be arsed in the end to remove what little history remained in this piece.

before after

IMG_7720 IMG_7722 IMG_7726

Below are some photos of the next hipster project I undertook. I had an old three-drawer dresser loitering about in my guest bedroom, looking pathetic and scratched a bit to hell. So, I did what any hipster would do and primed it white. Here is the photographic evidence.

20140401_143519And then some photographic evidence of the priming project. Naturally, I took the photo with my smartphone. Anyways, here is the same dresser, primed and ready for paint!

20140402_125417

The next phase is to spend about a week on Pinterest eyeballing other hipster’s projects and to (hopefully) pick a look I love and then try to copy it and claim credit for the concept. I’ll upload more photos of my upcycle project as it progresses.

This novice needs an overpriced locally-produced, organically handcrafted, fair-trade brew to consume while searching for the perfect paint color for my hipster dresser. Be back soon with pictures of the final project

_______(MUCH LATER)________

Okay ladies and gents, I know you have all been eagerly awaiting a picture of the final project. Here it is! It went peacock blue with a black antique glaze finished with a lacquer to give it some shine (and protect it from my birds, cat, dog and toddler).

20140409_162040